Hi all you crafters and up-cyclers out there! Today is Day 1 of Braid-A-Long 2012 and I hope you are ready to take on this really fun little project!
If you haven’t gathered your supplies just yet don’t worry, you can do that as we go along. For a full list of what you’ll need see this post. Obviously, the first thing we need to do is transform all of our t-shirts we are going to use into t-shirt yarn.
You can do a few at a time or do them all at once, it is entirely up to you! For me, I am in the camp of doing a few at a time, probably more so because I only have an hour or two every day to spend on my creative projects and I like to do a lot of different things. So I’ll cut up a few t-shirts, braid them, sew them, see how they look and then go back to cutting. It’s up to you, but as you know we can’t braid until we make the yarn!
To Make the T-Shirt Yarn:
STEP 1: Make the T-Shirt Yarn. Each t-shirt can make a continuous piece of yarn that is 2″ wide by 20 or more feet long!
Start by laying the t-shirt flat on a cutting mat. Then cut off the shirt just under the armpit. We’ll deal with that top portion a little bit later… Now, fold this bottom half of the shirt back onto itself leaving the folded portion about 4 inches from the edge…
 Next, what I like to do is use a ruler that I can see a 2” marker and start from the left side (the underarm) and work my way down to the hem. This is slightly different from my first post about t-shirt yarn way back last year. Trial and error I guess, but this method works really great for me and is just a bit faster. So start at the left edge and line up the 2” mark on the ruler and slice through the 4 layers of shirt all the way up from one edge BUT NOT THROUGH the other edge!
 Next, open up the un-cut side. You’ll then start at one end and slice the beginning on a diagonal…
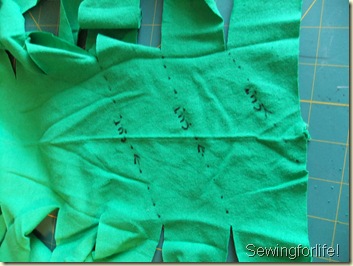
 Then continue the diagonal cut to eventually yield one long continuous piece of 2″ wide material!
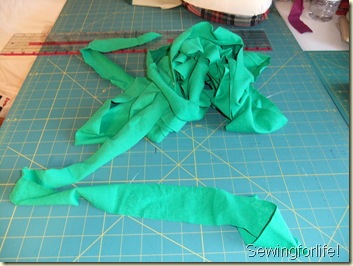 Now, here’s the cool part. Start stretching! Really stretch the fabric. It will lengthen and curl the raw edge into itself!
 Roll up this length of yarn into a ball and now let’s work on the top portion. But before I begin that part I want you all to know that this top portion is optional. You don’t have to use it if you don’t want to as it will have sort of a different feel in your hands while you braid because it will include the shoulder and sleeve seams, something that not everybody wants. If you are a hard core up-cylcer and want to use it ALL then this is definitely is for you. For the braided rug that I’m going to be showing you this time I did use THE WHOLE T-SHIRT.
So for the top of the t-shirt…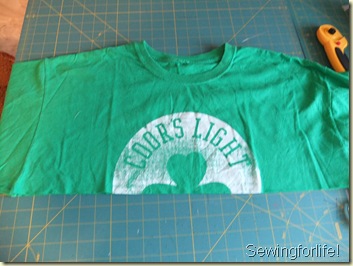 Slice through the underarms to open it up…
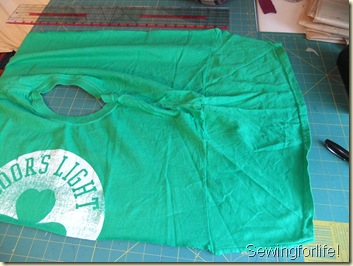 Now remove the neckband, just cut it out…
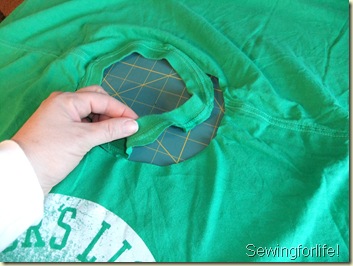 I am just setting these aside until I get a number of them. I’m thinking these might be a good edge trimming for some kind of cardi/sweater creation I have in mind but you can do whatever you want with these. I can’t say if they will work in the braid just yet as I haven’t done that but I don’t see why they wouldn’t if they are sewn together and trimmed…
Anyhoo….for this green shirt I just trimmed off the rough edges, the sleeve hems and cut into 2” strips…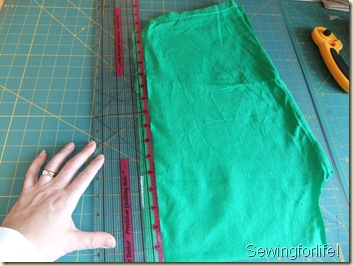 And you end up with these…
Which are perfect to add little splashes of color as you braid but are also good for starting the braid!
To join the Braid-A-Long visit the Sewingforlife! Flickr group and upload your pictures of your braid. I’d love to see what you all are working on. Here is the link…. Sewingforlife! Projects Group on Flickr
That’s going to be next! Until tomorrow!
~Cathy
Related articles
- Braid-A-Long 2012 Day 2 – Starting A Braid (sewingforlife.wordpress.com)
- Braid-A-Long Day 3 – Attaching A New Color (sewingforlife.wordpress.com)
- Braid-A-Long 2012 Day 4 – Finishing The Rug! (sewingforlife.wordpress.com)
- Who Wants To Do a Braid-A-Long? (sewingforlife.wordpress.com)


so cool. Where did you find all of the shirts
LikeLike
This is so nifty!!!! Love it!
LikeLike
Thanks for your great tutorials. you have inspired me to make my own rug.
I have written a tutorial on my own blog but will be referring back to yours for most of the technique as you have done a great job and i don’t want to double up. I will be focusing mostly on trouble shooting and some of the challenges I faced with solutions, and how to make an oval rug.
I hope you don’t mind, I’m sure my readers will learn so much from your tutes.
Thanks again
Cintia
LikeLike
Thanks Cintia! I hope your rug comes out great. I think the more of us working on these rugs the better and we can learn from each other! I worked on an oval rug too but did not blog about it. There are so many things you can do with this, so many projects, so little time. Please link up and share!
Bests!~Cathy
LikeLike
I love your rug, it has inspired me to make my own! I have loads of old T-shirts, and have already begun cutting them up, but when I stretch them they will not curl up like yours do. Any ideas why??
LikeLike
Hi Susieq,
It is okay if they do not curl like mine, they will still work. My guess it is the way the shirt fabric is knitted. Check out mypoppet.com.au she just recently made an oval one using my technique and hers turned out great! Yours will too!
Cheers!
Cathy
LikeLike
Thanks, Cathy, for the encouragement!! I’ll see what happens then!
LikeLike
Hi, I hope you don’t mind but I’ve featured you in my blog. Ive recently used your methods in my own craft projects, so I wanted to link back to you so my followers know where to go! Thanks xx
http://rosesandrainbowsblog.wordpress.com/
LikeLike
I love this rug, and I’ve started making my own. Question… Am i the only one that is experiencing frustration during the braiding process? It keeps getting all tangled up? Anyone have any suggestions of how to avoid that? After about 6-12″ i have to stop and untangle!
LikeLike
The trick is to keep one of the three strands short. See the next post in the series: https://sewingforlife.wordpress.com/2012/02/26/braid-a-long-day-3-attaching-a-new-color/
I talk about this very issue!
You need to have one short so you can pull it through, when you pull that shorter length the other two will automatically untangle themselves! Hope that helps! And I can’t wait to see your finished rug, I hope you like it!
Cathy
LikeLike
Please see this post…
https://sewingforlife.wordpress.com/2012/02/26/braid-a-long-day-3-attaching-a-new-color/
I talk about this exact issue and why you need to keep one of the strands shorter than the other two!
LikeLike
I tryed with a stretchy shirt and it didnt work? Will it ever
LikeLike
Reblogged this on *B*A*M! crafts and commented:
Excellent instructions for making t-shirt yarn.
LikeLike
i am trying to make the long continuous strands of yarn and have hit a snag on the second picture were before you cut diagonals. we have tried four different ways last one after making slices we folded it out then cut the bottom so it could lay with the strands on both sides so that when we go to make the diagonals they would just end up as separate strands instead of one strand. i will post a picture on my pinterest under crafts will leave link: http://pinterest.com/pin/119486196336745196/
LikeLike
Hi Patricia,
Okay, so this is going to sound dumb, but are you wanting individual strands? Or do you want to have the one long continuous length? I see your picture and I think it looks like you are just slicing through in strips, right?
To get the long single length you need to make sure you don’t cut through one of the side seams of the t-shirt (although some t-shirts don’t have side seams at all because they are knitted in a loop, but let’s just call it a side seam).
So it will look like what you have in the picture but it won’t be cut on one of the sides, it will just be a big round tube with slits.
Insert your scissor into the first slit. You’ll have fabric on either side of your scissor. Cut toward the hem at a 45 degree angle. Just make one cut. One of your ‘slits’ will fall away. Now follow that until you get to the side seam and make another cut on the diagonal to the next slit up. Does that make sense? then that slit will fall away! Do you see how that works? Keep going all the way up until your last cut on the angle goes to the outer edge.
Let me know if this helps.
The length of t-shirt you cut can always be sewn together too so don’t worry about that! They will still work!
~Cathy
LikeLike
I just cut one tshirt following ur tutorial..i am loving it..will post my rug incase i am successful in making a decent one. Thanks 🙂
LikeLike
by the way your new instructions did help, I just need to keep making more balls of yarn to start my rug.dang arthritis keep hurting. It just looked strange cutting it that way but it worked. Thanks again for the response, it helped out a lot.
LikeLike
Just found this…I am definitely going to do this, it’s getting bookmarked today!
LikeLike
make sure the yarn is not to thick, I tried and tried and some were so big they would not go under the needle of the machine and kept making the cup form no matter what I did.
LikeLike
Thanks for the heads-up on that!
🙂
LikeLike
Hmm. What machine were your/are you using pcollet1? I used a Bernina to make mine. It is true though. Start with a starter braid using the 2″ strips and see if that will work. If it is too big then cut your strips 1-1/2 inch and so on until you get it to work. Just for the record I did have to squish mine under the pressure foot…
LikeLike
yes, the rug is super fun!
LikeLike
Whoever edits and puilsbhes these articles really knows what they’re doing.
LikeLike
Can you use shirts with logos on them? Would the writing show or be hidden by the braid?
LikeLike
Yes. In the tutorial for cutting I show a shirt with a logo.
LikeLike
I’m getting ready to make 25 of these in a circular shape for my students to read upon! I bought 90
Tshirts at our local junk store ($0.33 each) and am ready to get started!
LikeLike
Whoot! That’s fantastic Angela! Some have had better success with an oval shape, just keep it loose. The ones I made many many years ago have gone through the wash and been just great, just a little reshaping when damp. They are wonderful. Good luck!
Cathy
LikeLike