
Hey Everyone!
Jim and I talked about getting this little technique on camera, in case you do your own wood floor installation some day and need to borrow this idea! This came about after several unsuccessful attempts at trying to ‘close the gaps’ in between the boards. My husband really is quite clever!
See the gap in the photo below? This is what we are talking about. Sometimes when you hammer the board into place, no matter how many times you hammer (don’t want to do too much or you’ll ruin the board) or even how HARD you hammer (still risking ruining the board by whacking it too hard) there have been several spots where we just couldn’t get these gaps to close!

Nobody wants a floor with gaps! We would try a two person technique where I’d push on the board with all my might to close the gap while Jim hammered. That worked to some degree, but what if I wasn’t there to help?
We tried changing the board. Sometimes this worked, sometimes not. Sometimes when you changed the board you now have to go and re-sort all the boards in the row to get them to line up properly, or you’d have to try several boards and that was getting tiresome!
So the solution is to use a block of wood as a fixed hard stop that wedges could be hammered in between the block and the board, thus amplifying the amount of force we are able to render onto the board, and close the gap!
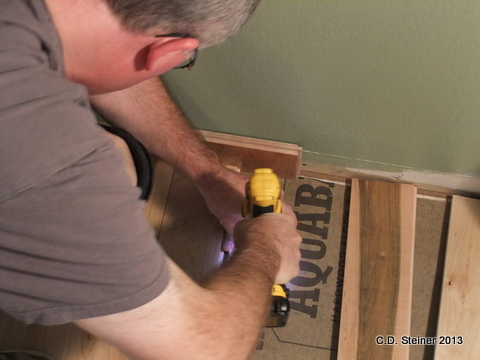
First, the block gets screwed in a few inches from the board…
then wedges are hammered in on both sides of the block…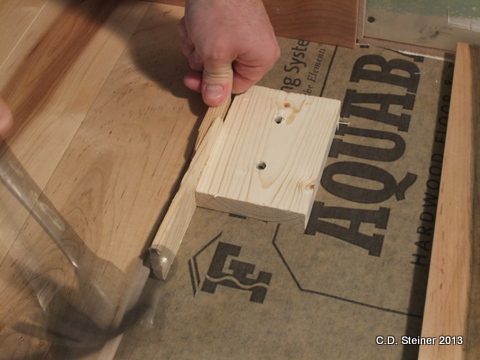
The gap will close easily!
Then it’s just a matter of nailing the board in place…
Once the board is in place, remove the screws and continue on…
Genius…
Happy Home Improvement everyone!
~Cathy (and Jim)
Related articles
- Home Improvement – Is this photographic proof I helped? (sewingforlife.wordpress.com)

Hi Cathy. Jim’s tip is a great one. I’m sure lots of people get stuck with this problem. Thanks posting.
LikeLike